
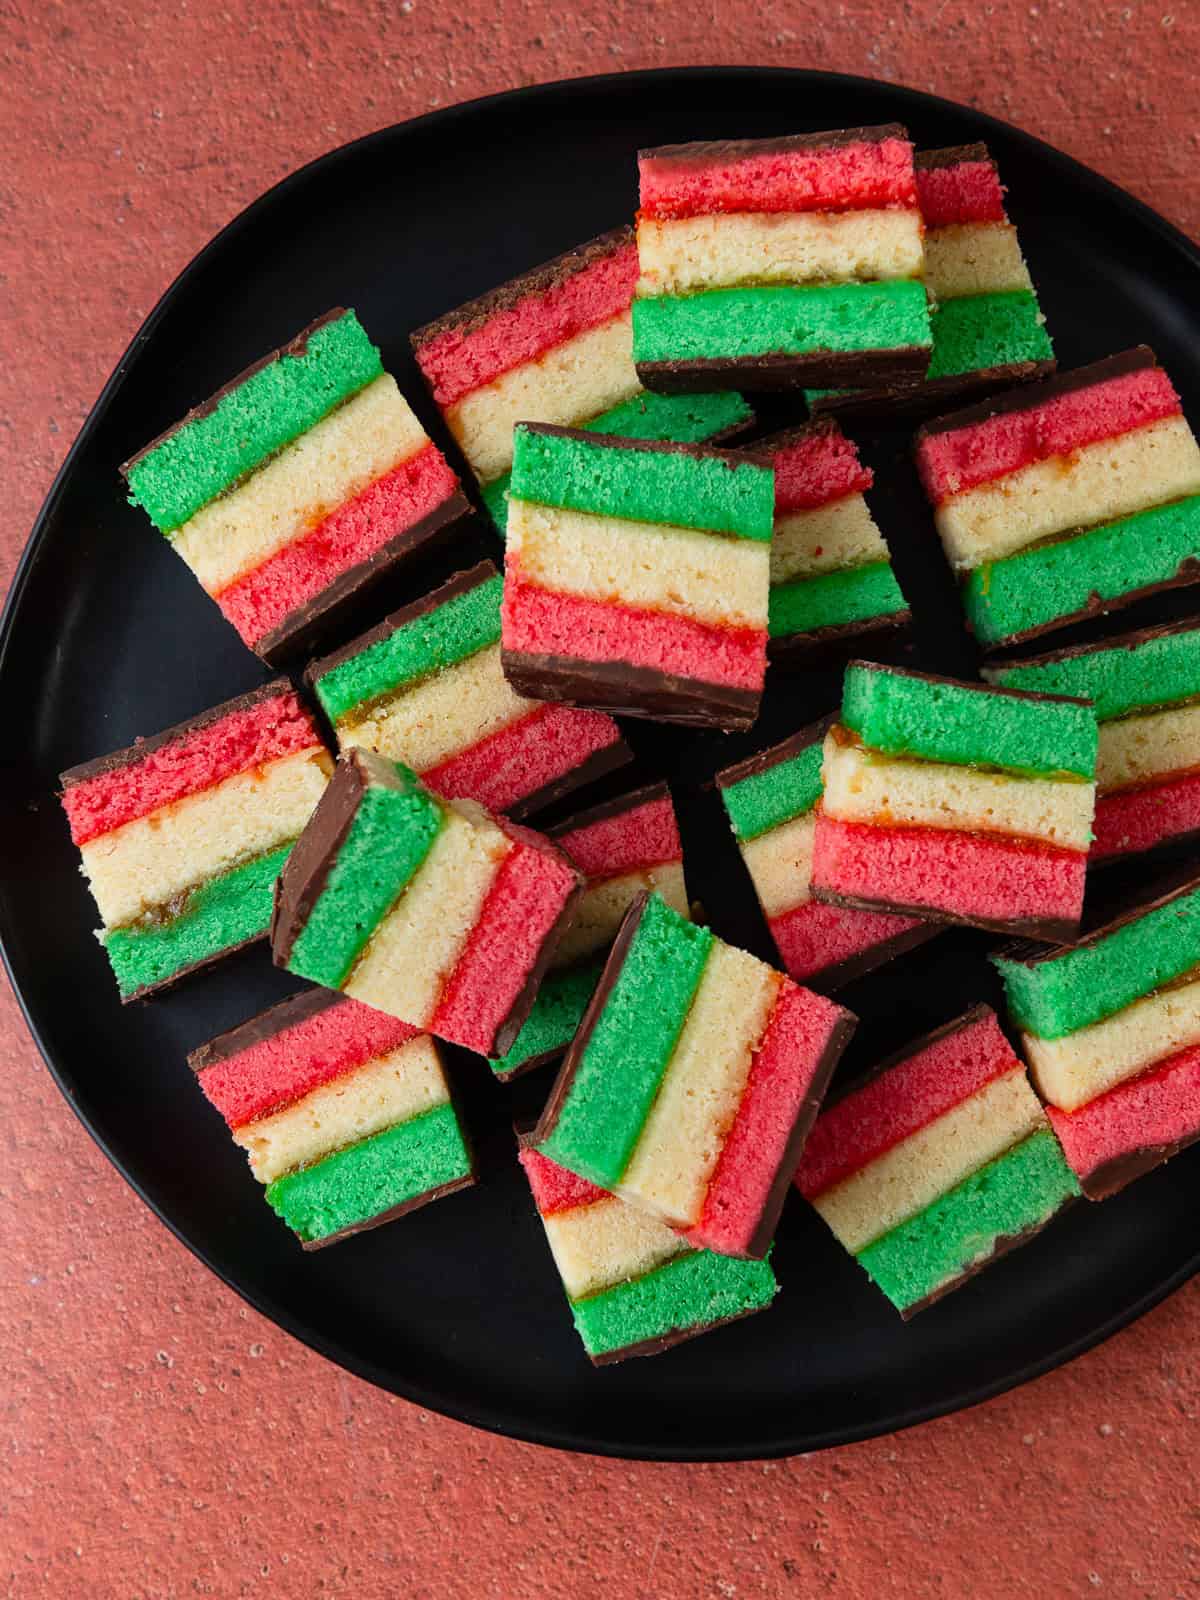
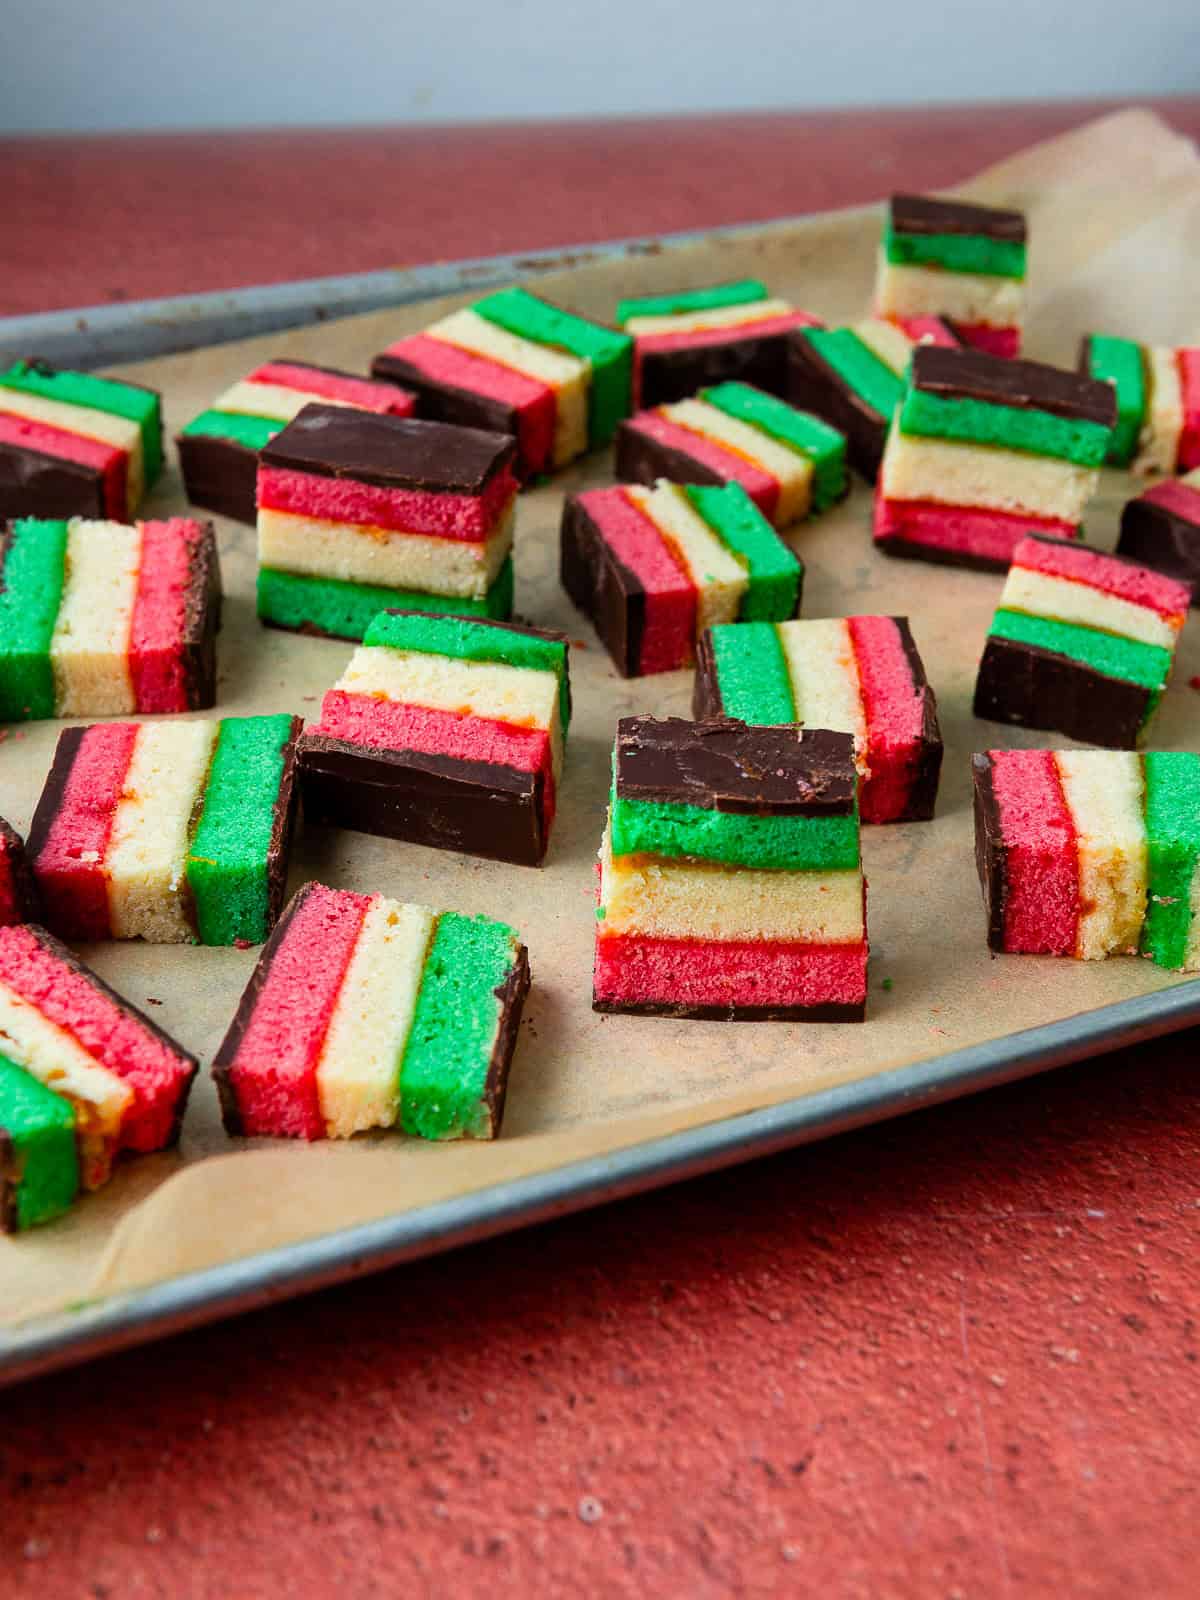
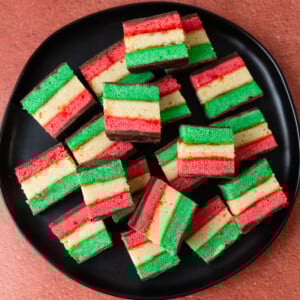
Italian rainbow cookies are a classic bakery favorite! These iconic tri-color cookies are more like little cake squares made with aromatic almond cake, layered with sweet fruit jam and covered in decadent chocolate.
Rainbow cookies take me right back to my childhood growing up in New York and they are the first ones I reach for during the holidays. That is, along with rugelach, of course.
Jump to:
What are Italian Rainbow Cookies?
Italian rainbow cookies, also known as seven layer cookies or Venetian cookies, are classic tricolor treats commonly found in Jewish and Italian bakeries on the East Coast. They are called seven layer cookies because of their distinct layers. Three thin layers of almond cake are stacked with a light layer of jam in between and finished with a chocolate coating on both sides.
They are more like a petite cake rather than a traditional cookie and are still one of my all-time favorite treats! They are truly a labor of love that is worth every single minute. Think of these as little squares of cake with an aromatic almond flavor, a hint of fruit, and just enough chocolate to bring it all together.
Unlike many traditional recipes that bake each layer separately, this version uses one sheet pan with all three layers baked side by side, making the process simpler and more approachable.
📋 Ingredients
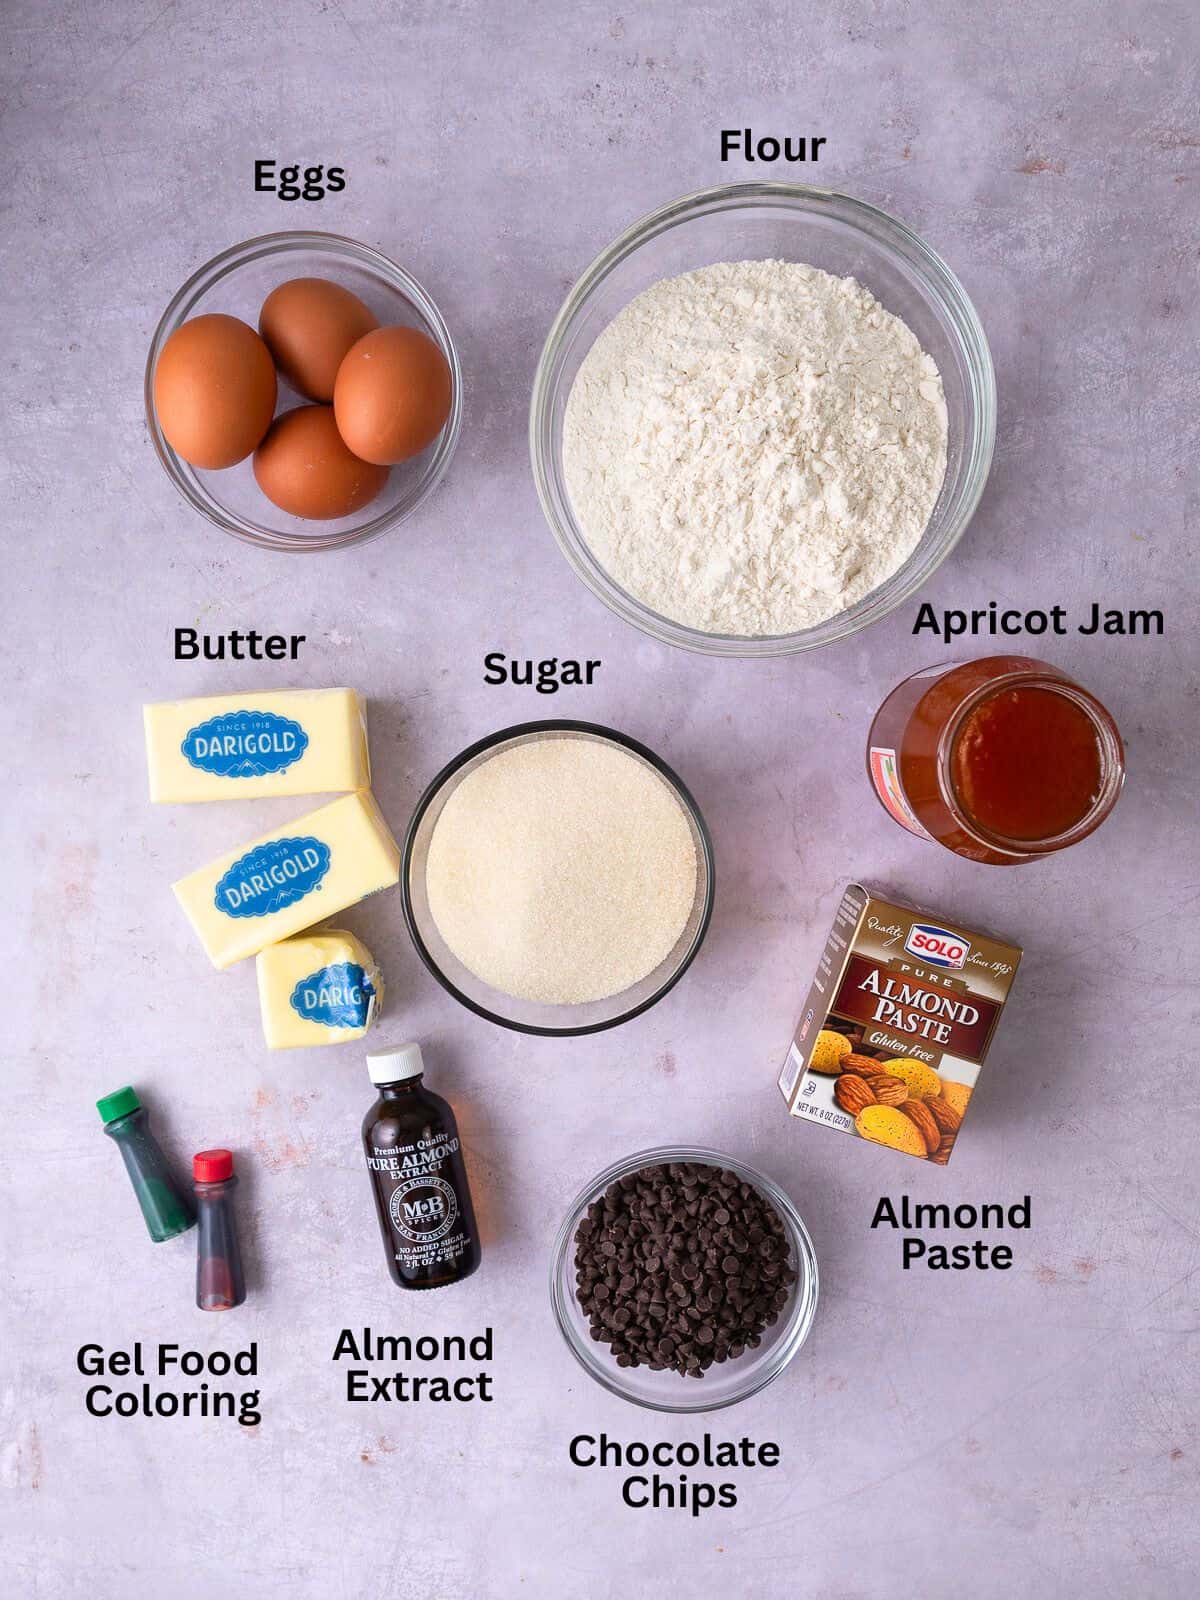
- Almond paste: This is the key ingredient in rainbow cookies. Almond paste is made up of ground almonds. Unlike marzipan, which has sugar added, almond paste is less sweet and often used in pastries.
- Gel food coloring: All you need is a few drops to get that vibrant red and green that rainbow cookies are known for (natural colorings will be softer).
- Eggs: Use whole eggs and bring them to room temperature. This helps the egg whites whip more easily.
- Apricot or raspberry jam: Look for a smooth jam with no large pieces of fruit.
- Bittersweet chocolate: Because the rainbow cookies are sweet, bittersweet chocolate pairs nicely as the coating without adding too much sweetness. Look for at least 70% cocoa.
- Almond extract: This adds another layer of almond flavor. Don’t overdo it though, as almond extract is potent.
See recipe card for full information on ingredients and quantities.
🍋 Substitutions and Variations
- Different Fruit Jams: Raspberry jam is a classic alternative and pairs beautifully with chocolate. Apricot is traditional and my personal favorite.
- Jam texture: If your preserves are chunky, whisk briefly or warm a few seconds in the microwave to loosen them without heating them too hot.
- Coloring: Gel food coloring gives more vibrant layers. However, natural coloring works, but you’ll need significantly more drops and colors won’t be as vibrant.
- Gluten-Free Option: I have successfully made Italian rainbow cookies with a gluten free flour blend, with great results.
⏲️ Instructions
How to Whip Egg Whites
Whipping the egg whites correctly is key to creating light, even cake layers. Take your time and focus on texture rather than speed.
What to Look For:
- Foamy to glossy: At the beginning stage, the whites will start foamy, then turn bright white and glossy as air is incorporated.
- Stiff peaks: When you lift the whisk, the whites should hold their shape without drooping.
- Smooth and cohesive: The whites should look thick and silky, not dry or grainy.
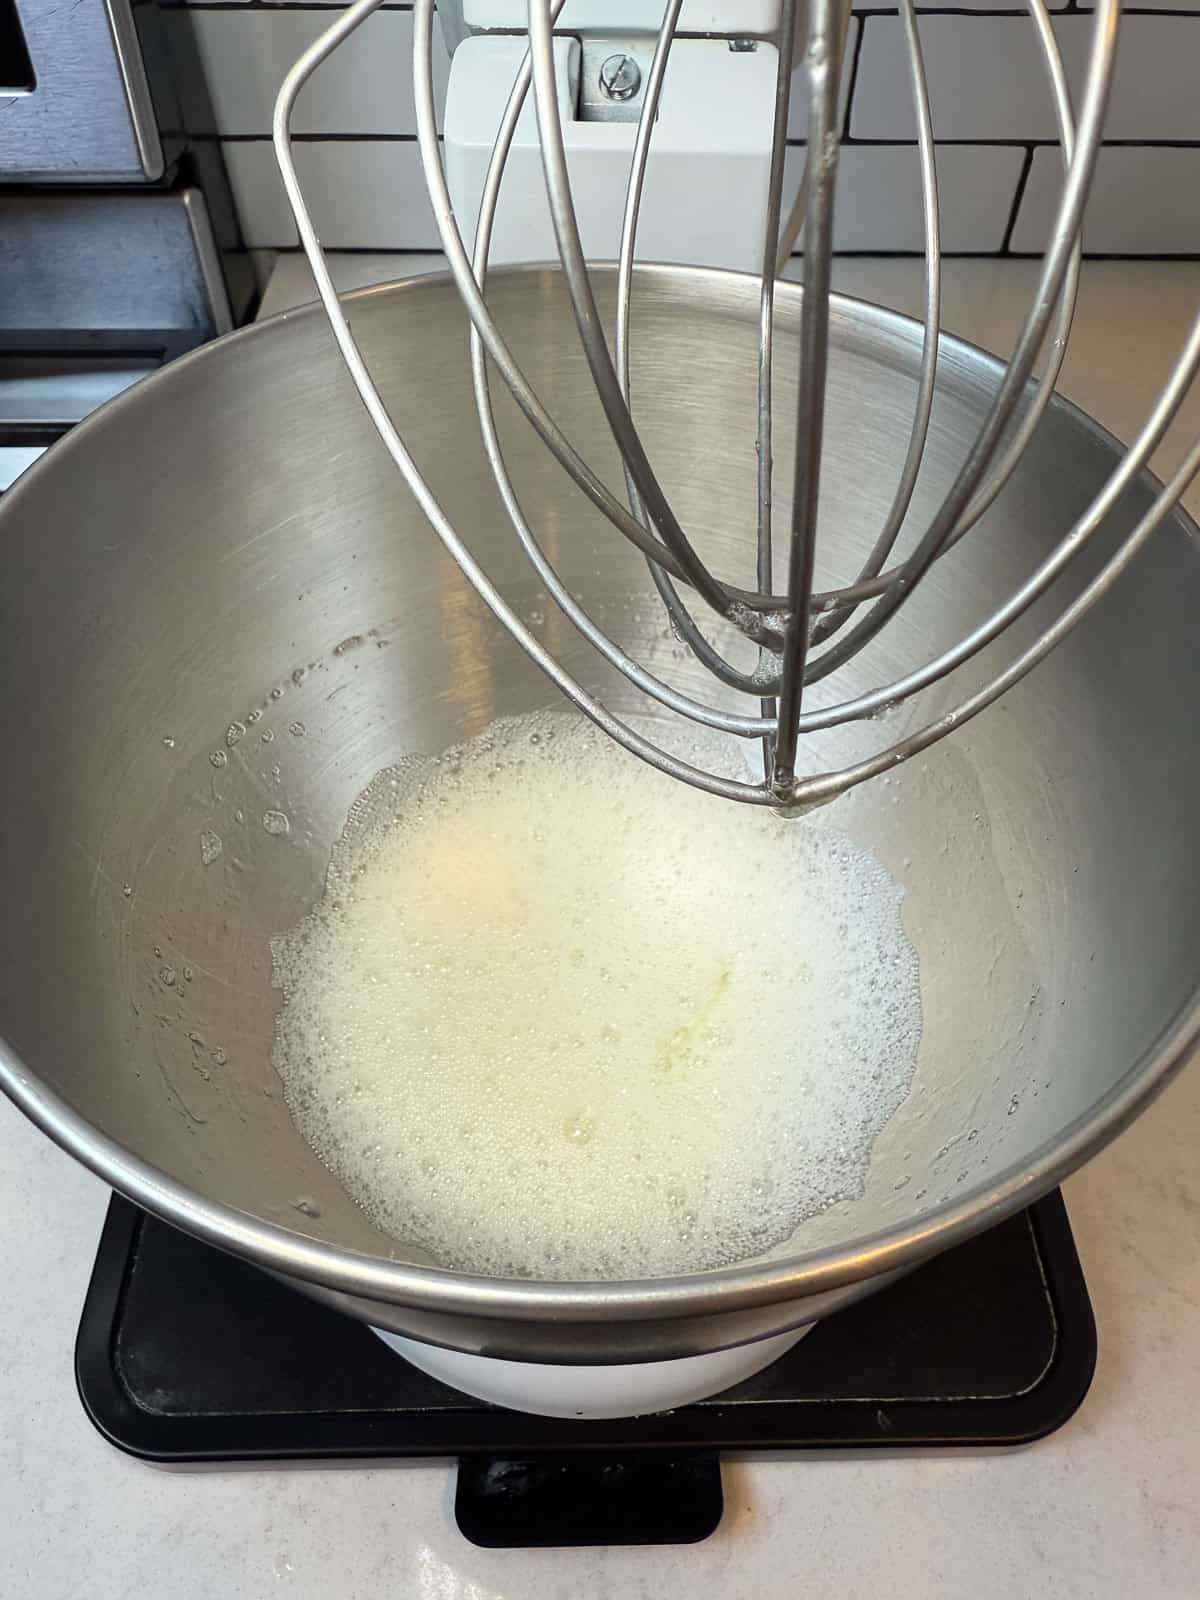
Beginning stage: As you begin to whisk the egg whites, they will look foamy.
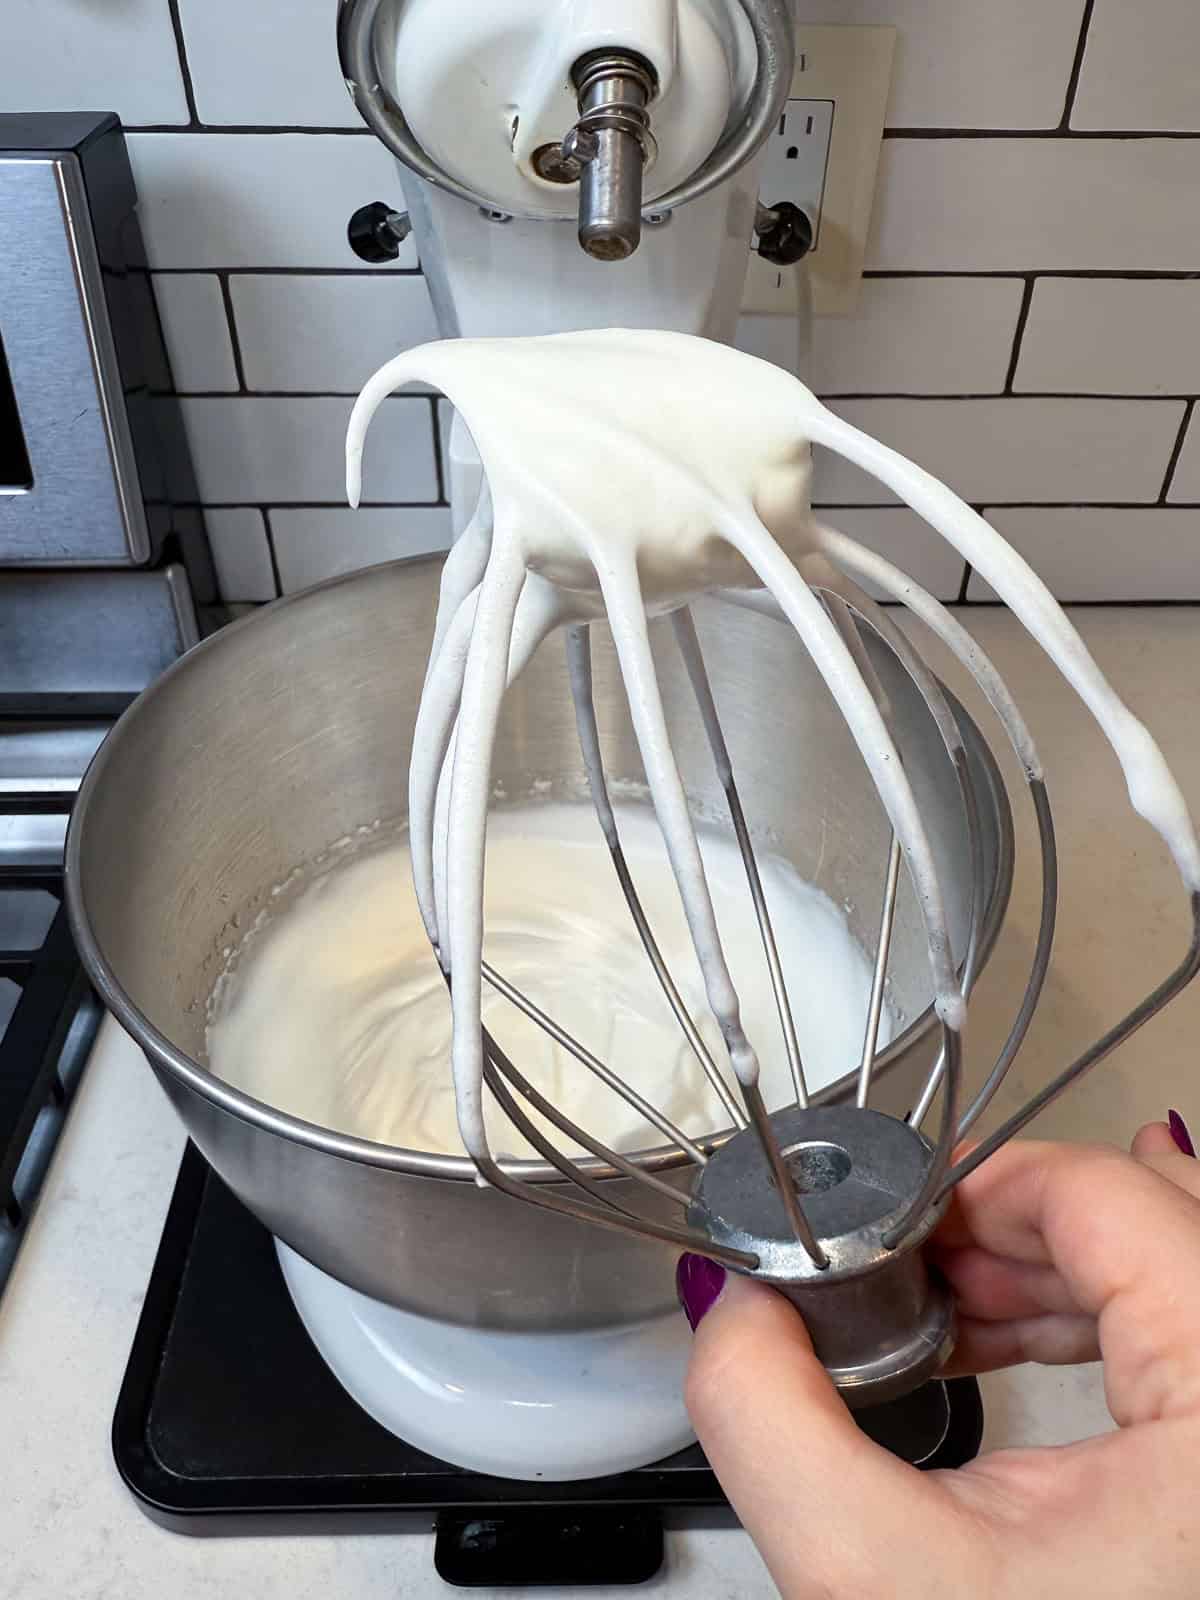
Whisk to stiff peaks: Continue whisking and the whites will become stiff, glossy, and will hold their shape on the whisk. This is exactly what you’re aiming for. Then transfer to a separate bowl.
How to Make Rainbow Cookies

Prepare the almond batter: Beat the almond paste, butter, sugar, egg yolks, and almond extract until smooth and fully combined.
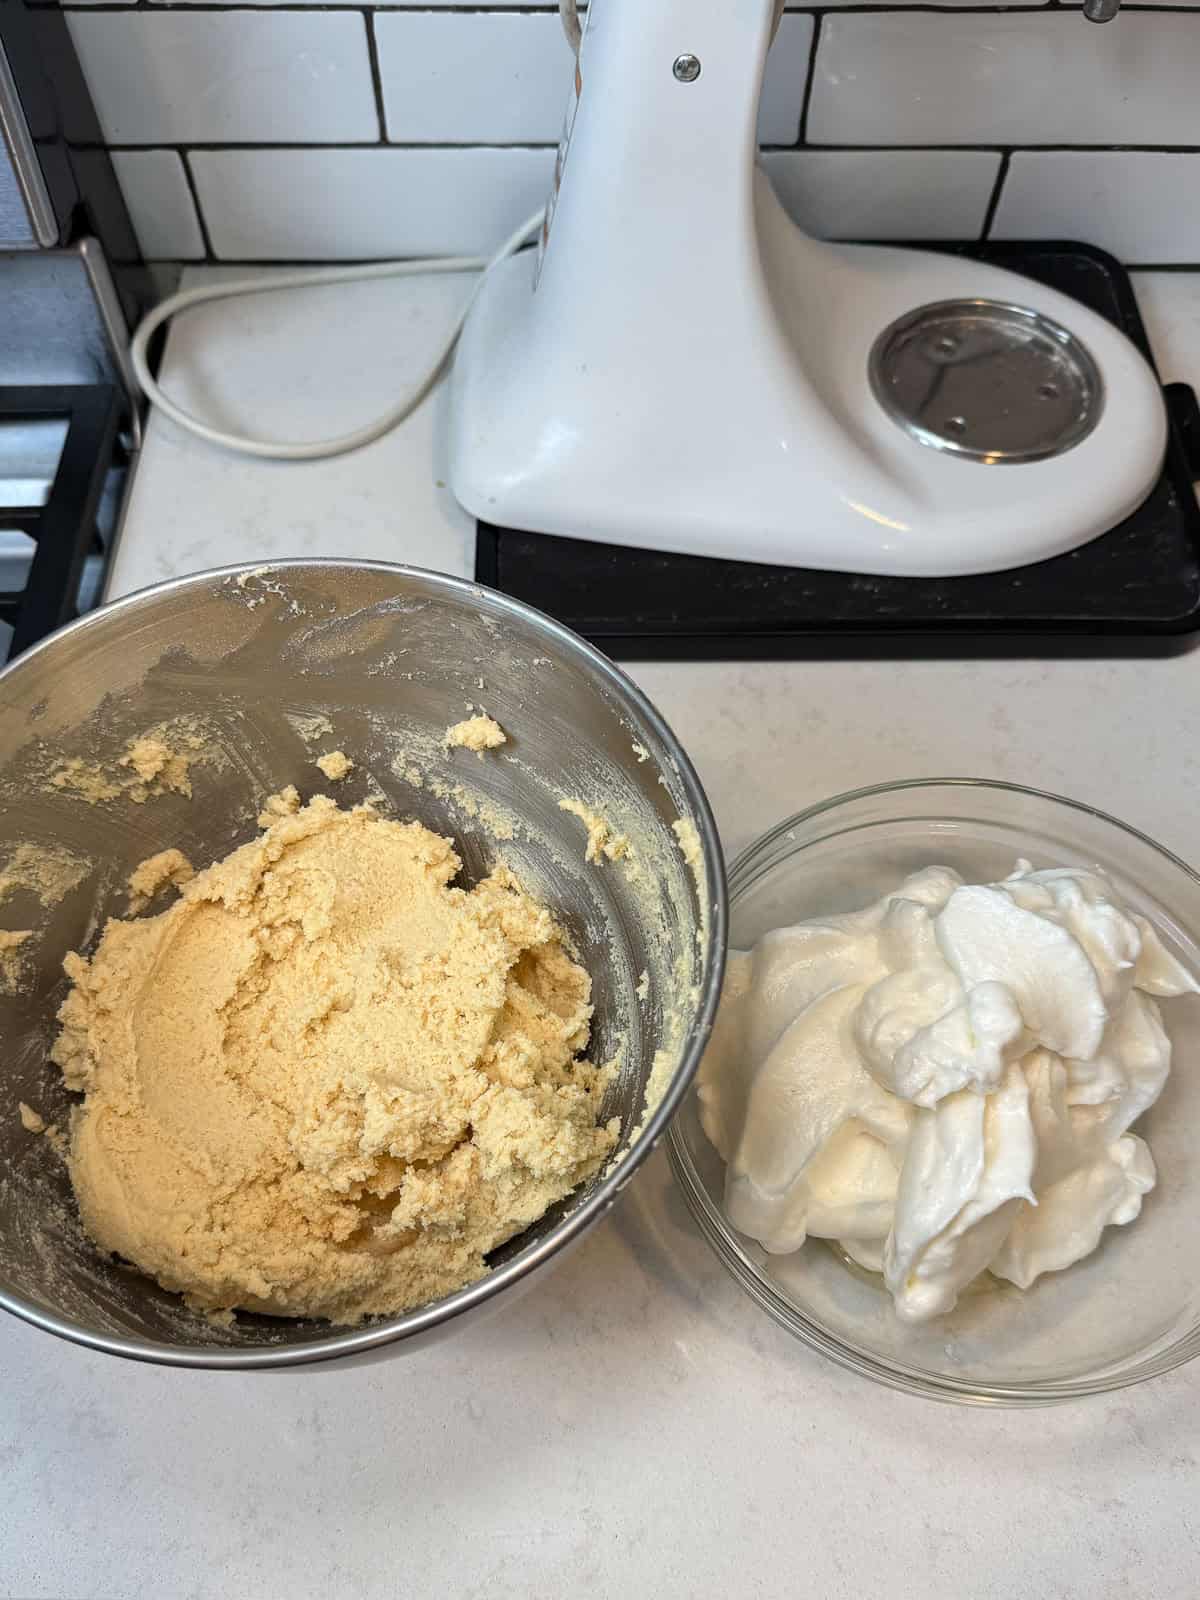
Fold in the egg whites: Use a rubber spatula to fold half of the egg whites into the almond batter, then continue with the other half until just mixed through.

Divide and color the batter: Divide the batter evenly into three bowls. Tint one bowl with red food coloring, one with green, and leave the third plain.

Spread the batter: Spread each color into a thin, even layer on the same parchment-lined sheet pan, keeping the colors side by side. Use an offset spatula and spread each section about 5 inches wide.

Bake and separate: Bake until just set and lightly golden. Once cooled, cut between the colors to separate the three cake layers.
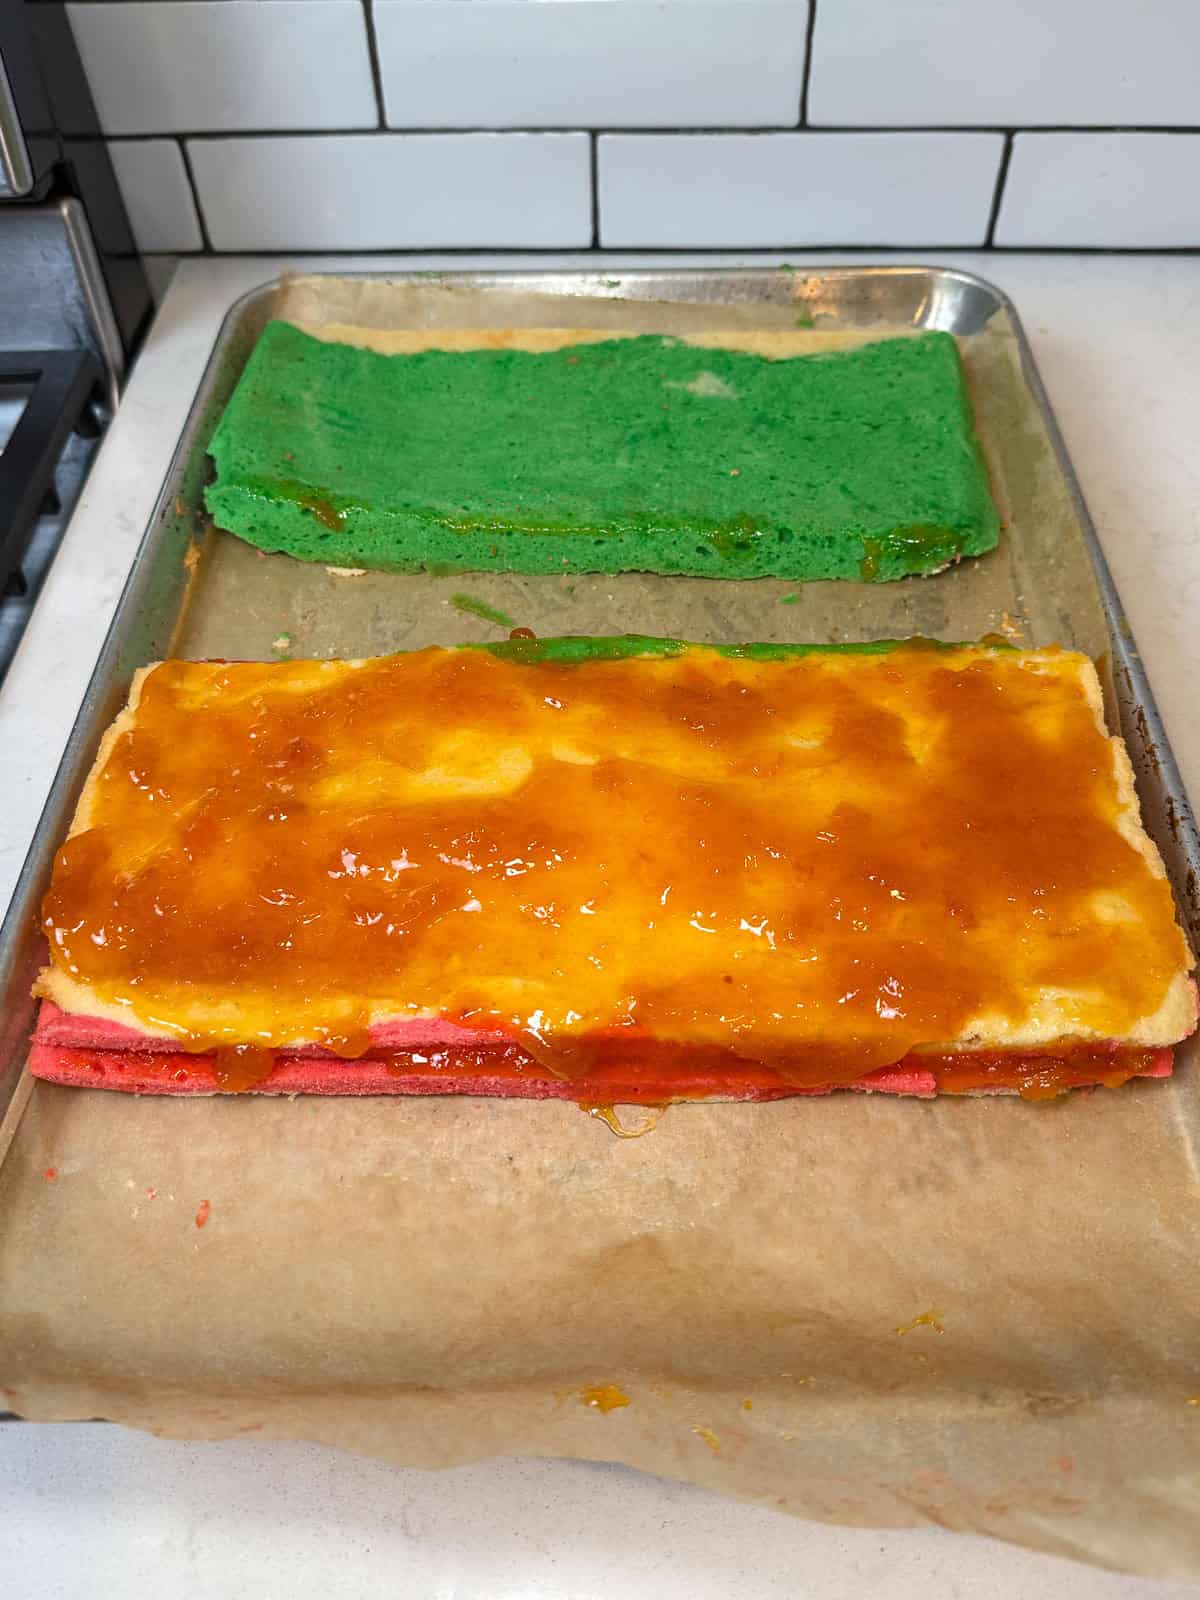
Spread Jam: Place one colored layer on a flat surface and spread a thin layer of jam on top.
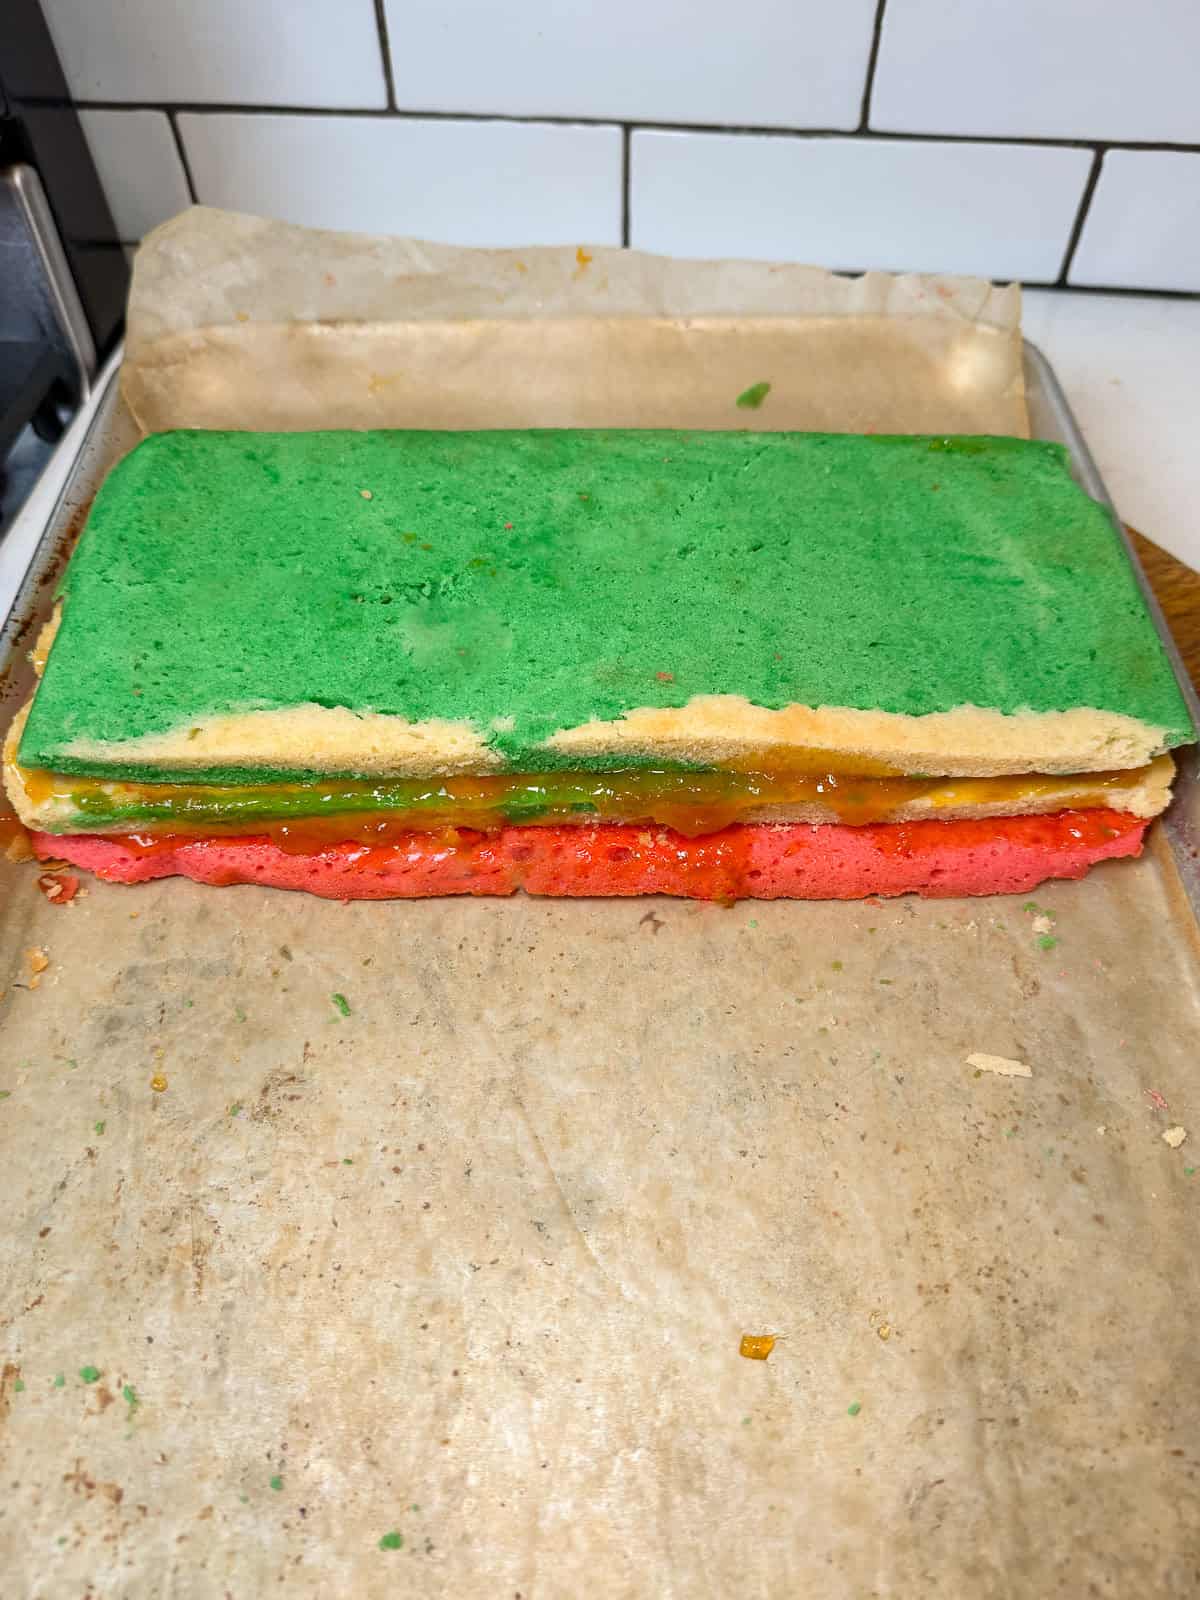
Assemble the layers: Stack with the remaining layers, adding jam between each.

Press and chill: Place a sheet of parchment paper and top with a sheet pan, and weigh down with cans. Chill for at least 8 hours or overnight.

Melt the chocolate: Melt the chocolate in a double boiler until smooth and glossy. A double boiler is simply a heat-safe bowl set over gently simmering water.

Coat the layers: Spread a thin, even layer of melted chocolate over the top using an offset spatula. Chill until firm before flipping and coating the second side.
🔪 How to Cut Italian Rainbow Cookies
Cutting rainbow cookies is easiest once the chocolate is fully set and the layers are cold.
- Use a serrated knife for clean cuts.
- Trim the edges first for neat, even cookies.
- Cut into long strips, then slice into squares.
- Warm and dry the knife between cuts to prevent cracking.
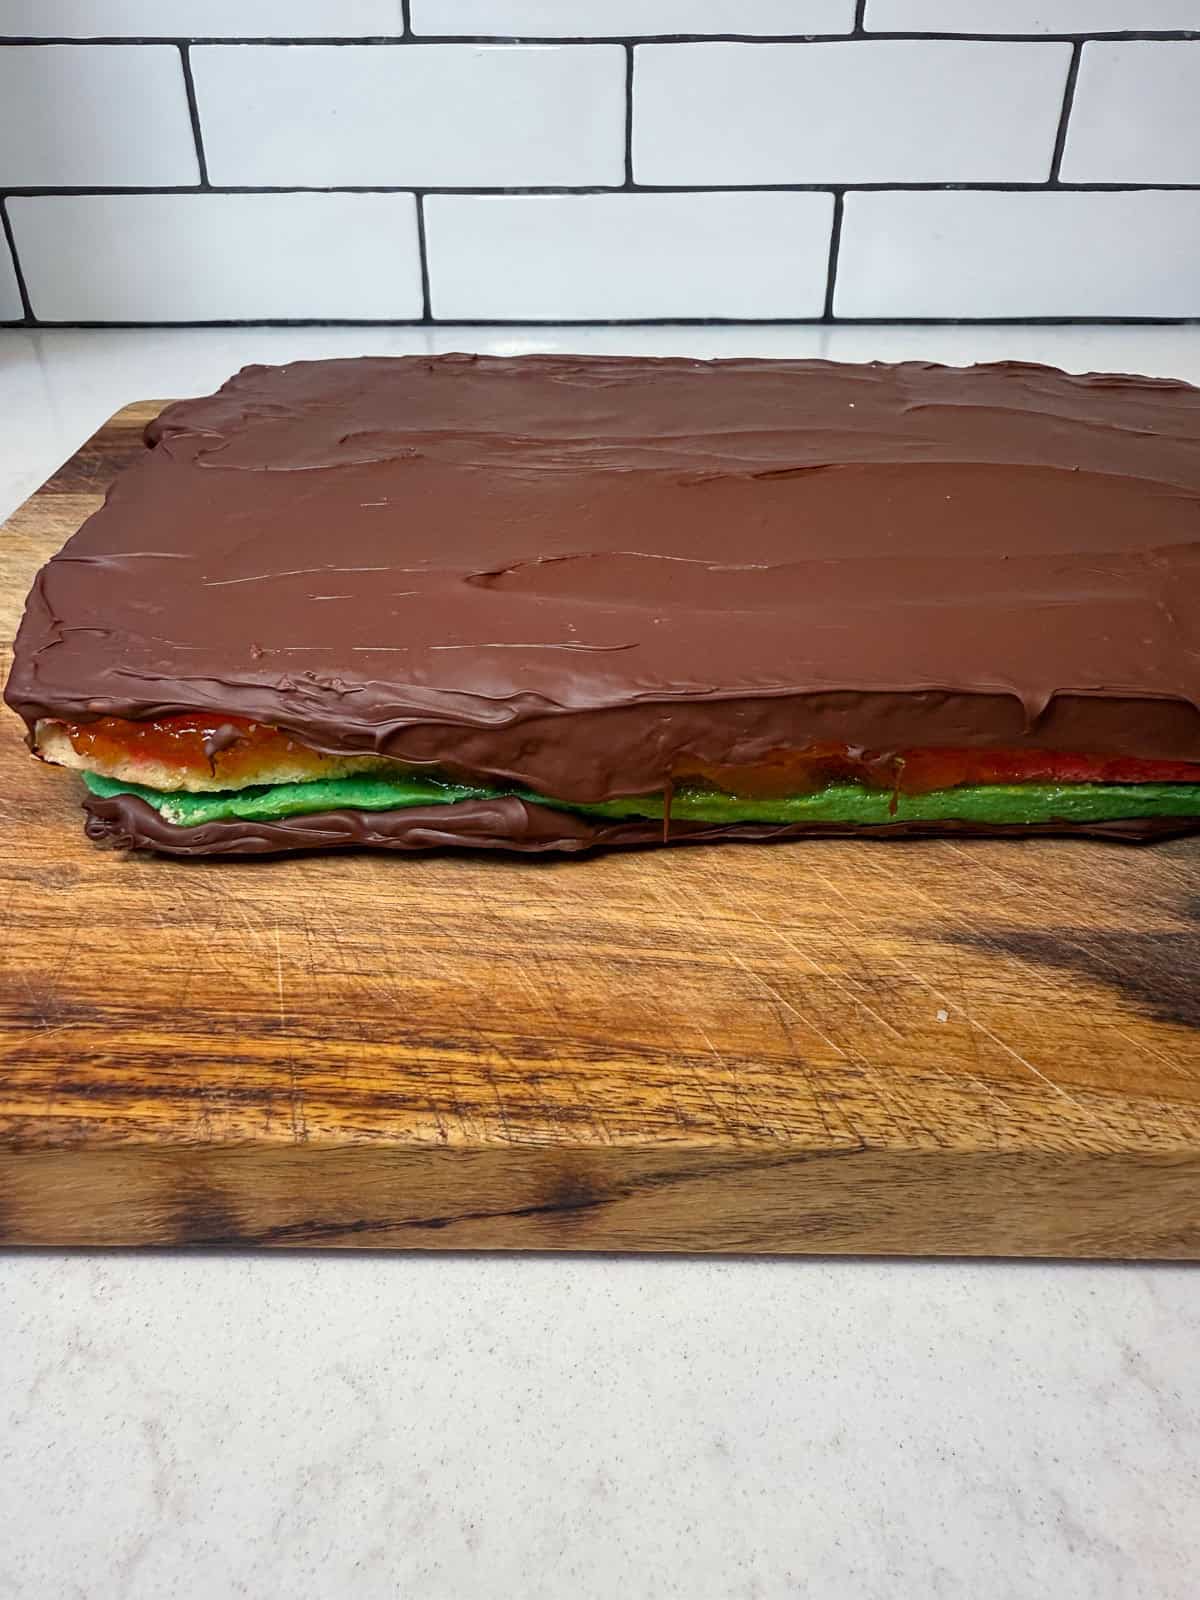
Chill the chocolate: Once coated in melted chocolate, chill in the refrigerator for at least 15 minutes until chocolate hardens. Then repeat with the other side.
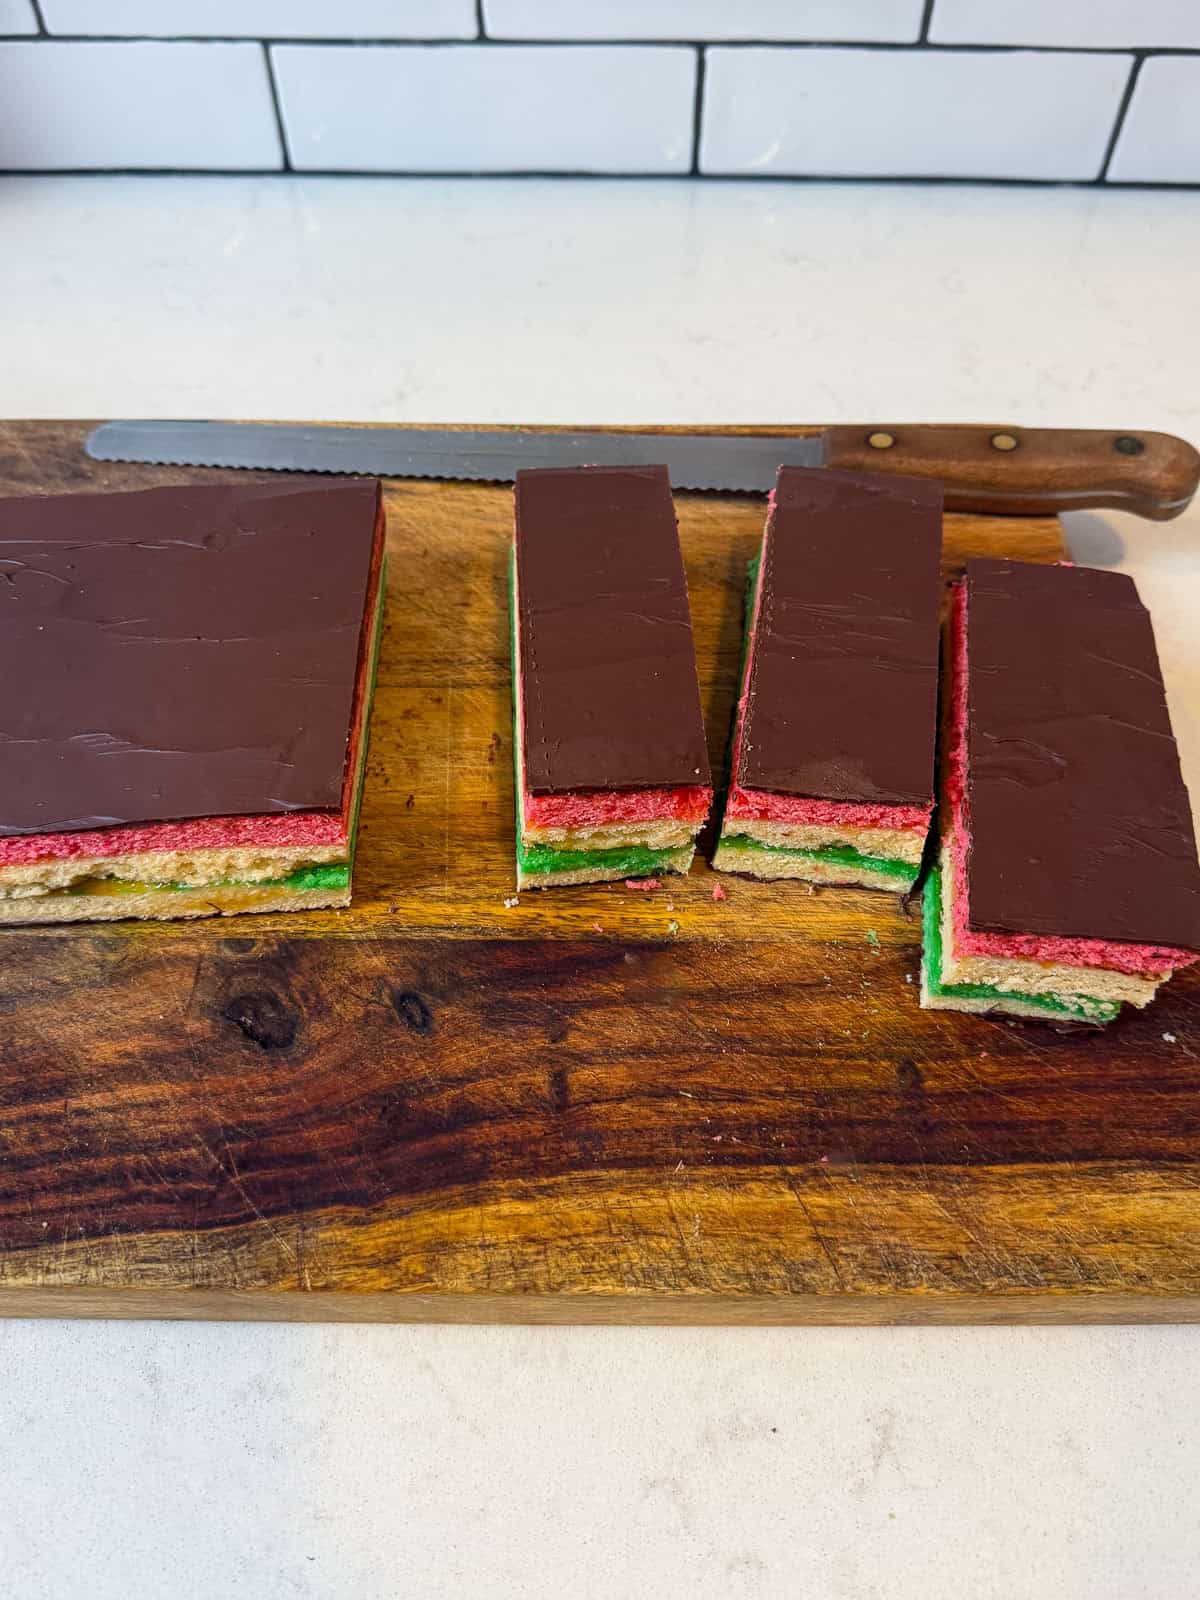
Trim and cut: Use a serrated knife to trim the edges, then cut into logs, then into squares.
How to Make Italian Rainbow Cookies (Video)
📍 Recipe Tips
- Don’t Overfill the Jam Layers: Make sure the jam has no large pieces of fruit and is easy to spread. Use only a thin layer between each cake. Too much jam can cause the layers to slide or separate.
- Use the Flat Side for Stacking: When assembling the layers, flip each cake layer so the flat side is facing up. This helps keep the stack even and makes the finished cookies easier to cut.
- Layers Might Crack: The almond cake layers are delicate and may crack when flipping or stacking. Once the layers are chilled and coated in chocolate, any cracks will not be noticeable.
- Chill and Weigh Down Overnight: Weighing down the layers helps everything bind together and makes slicing much cleaner. Place another sheet pan on top and weigh it down with heavy cans. Chill for at least 8 hours or overnight.
- Serrated Knife Is Your Best Friend: Use a serrated knife once the chocolate is fully set. Run the knife under warm water and dry it well before slicing for clean, sharp cuts.
- Bring to Room Temperature Before Serving: Remove the cookies from the refrigerator about 10 minutes before serving. The almond sponge and jam soften slightly and the flavors really open up.
Storage & Make-Ahead
Store the cut cookies in an airtight container, layering them between parchment or wax paper. Keep refrigerated for up to a week. The flavors get even better after a day or two.
More Favorite Cookie Recipes


Love this recipe? Please leave a 5-star 🌟🌟🌟🌟🌟rating in the recipe card below & a review in the comments section further down the page.
Italian Rainbow Cookies
LittleFerraroKitchen.com
Ingredients
- 4 large eggs separated and at room temperature
- 1 cup granulated sugar divided
- 1 8-ounce tube almond paste
- 1¼ cups unsalted butter softened
- 1 teaspoon almond extract
- 2 cups all-purpose flour
- ½ teaspoon salt
- Gel food coloring red and green
- 12 ounces smooth apricot preserves or raspberry preserves
- 12 ounces bittersweet chocolate chips
Instructions
- Preheat and Prepare the Pan: Preheat the oven to 350°F. Line a half-sheet pan with parchment paper, leaving a slight overhang for easy removal.
- Whip the Egg Whites: Add the egg whites to a stand mixer fitted with the whisk attachment. Begin whisking on low speed until foamy, then increase to medium-high speed.
- Once soft peaks form, slowly stream in ¼ cup of the sugar. Continue whisking until the whites are stiff, glossy, and hold their shape. Transfer to a separate bowl and set aside.
- Make the Almond Batter: Wipe out the mixing bowl and switch to the paddle attachment. Add the almond paste and remaining ¾ cup sugar. Beat until smooth and broken down, about 3 minutes.
- Add the butter and beat until light and fluffy. Add the egg yolks and almond extract and beat until fully incorporated.
- Add the Flour: Reduce speed to low and add the flour and salt. Mix just until combined.
- Fold in the Egg Whites: Using a rubber spatula, gently fold half of the whipped egg whites into the almond batter to loosen it. Fold in the remaining egg whites until just incorporated, being careful not to deflate the batter.
- Divide and Color the Batter: Divide the batter evenly into three bowls. Tint one bowl red, one green, and leave the third plain. Mix each gently until evenly colored.
- Spread and Bake: Visually divide the prepared sheet pan into thirds. Spread each color of batter into a thin, even layer side by side, about 5 inches wide per section. Use an offset spatula to smooth the tops.
- Bake for 23–25 minutes, or until set and lightly golden. Let cool completely.
- Separate and Assemble the Layers: Once cooled, cut between the colors to separate the three cake layers. Place one layer flat-side up and spread a thin layer of jam on top. Stack the second layer on top and spread another thin layer of jam. Finish with the final layer, placing it flat-side up for an even top.
- Press and Chill: Cover with parchment paper, then place another sheet pan on top. Weigh it down with cans or heavy items and refrigerate for at least 8 hours or overnight.
- Melt and Spread the Chocolate: Melt the chocolate in a double boiler until smooth and glossy. Spread a thin, even layer over the top of the chilled cake using an offset spatula.
- Refrigerate until set, about 15 minutes. Flip and repeat on the other side. Chill again until fully firm.
- Trim and Cut: Trim the edges using a serrated knife. Cut into long strips, then slice into squares. For the cleanest cuts, run the knife under warm water and dry it between slices.
Video
Notes
- Use a thin layer of jam between the cake layers. Too much jam can cause slipping.
- Stack the layers with the flattest sides facing up for the most even cookies.
- The cake layers are delicate and may crack during assembly. Once chilled and coated in chocolate, imperfections will not be noticeable.
- Chill the weighted layers for at least 8 hours or overnight for clean slicing.
- Use a serrated knife, warmed and dried between cuts, for the cleanest slices.
- Let cookies sit at room temperature for about 10 minutes before serving for the best texture and flavor.
Nutrition
This recipe was originally published in 2011 and inspired by Smitten Kitchen and has been updated over the years with simplified steps, ingredient tweaks, and a one sheet pan method.


Sheryl says
Hi,
Can you please tell me the measurements of your sheet pan?
Thank you,
S
Samantha Ferraro says
Hi Sheryl, The pan depicted and used in this recipe is 18X13. I will make sure to add this to the recipe page. Thank you and have a great week, Samantha.
Debbie Caraballo says
I'm a transplanted Texan living in NJ for the past 7 years - I had never seen one of these or eaten one, but decided I would learn to make them. Had great success, and make them quite frequently! I tend to make it into a 2 day task. When I put mine together, I do it in reverse order, ice the bottom, let it chill, then turn it over, and ice the rest! Thanks for posting, love the Spring colors!
Deb
Samantha says
How interesting Deb! I grew up in NY and always saw them in the NJ and NY bakeries! I need to make these again..it is a 2 day task but so worth it!
Pete Figlozzi says
Those look great! I love Rainbow Cookies and like you living in SoCal I cannot find them. Got them from Famighetti Italian Pantry (italianpantry.com) online though and they were the best I have ever had! Really moist and full of that almond flavor. I am def going to try making your recipe though looks great!
thanks for the recipe!