
This is probably one of the most beautiful creations I have ever had the pleasure of making.
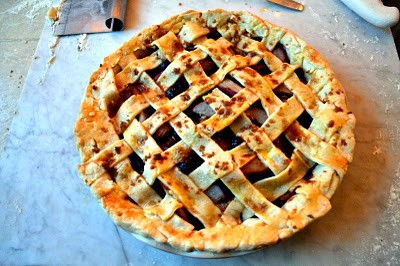
A few days before New Years, I created a Culinary Bucket list highlighting some amazing dishes and and techniques I want to conquer during the course of the year. One of those prized possessions....A Lattice Fruit Pie! I MADE a lattice fruit pie! With help, of course.
My Auntie, Evie is an amazing baker and was patient enough to teach me the art of a lattice pie while I was visiting Mom in Kona a few weeks ago.

It was pretty funny actually. My fast-paced California energy spread through my fingertips with excitement as I was rolling out the delicate dough. Evie made it very clear to gently and delicately roll out the dough and keep it uniform so cracks are minimal.
When it was time to pierce the dough once it was layed in the baking dish...well..uhh...I pierced it alright...more like stabbed it to dough-death. Gentle and direct pressure is enough for the fork prongs to do its work. Baking is calming. I almost forgot that.
Before I go on to the recipe, I want to introduce you to my Auntie Evie who is the VP of the Hawaii Gourd Society. Here is a video about the Gourds and how they are grown and made.
I will also take you on a photo tour of her amazing Hawaiian garden behind her house, filled with several Hawaiian fruits, vegetables and also where she grows some of her Gourds!
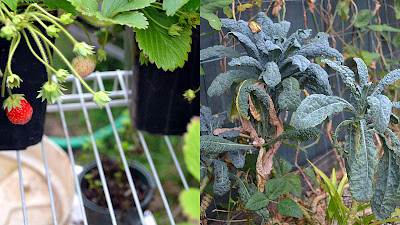 |
| Strawberries and Chard |
 |
| Green Beans, Meyer lemons and Papaya |
 |
| Tomato House, Baby Gourd, Kale |
Now onto the fruit pie. This pie is like nothing you have ever tasted before. The fruits involved were Hawaii mountain apples and organic blueberries. Hawaii mountain apples are so unique and
floral. Smaller than your traditional red apple, these Hawaiian jewels have a perfume tone and what I would even say, a rosewater flavor. Auntie Evie has a Hawaii mountain-apple tree on her property so those were the apples we used. I haven't seen anything close here in California, but I would love to experiment with a small red-crisp apple (Macintosh?) and perhaps a Tb or so of rosewater to get the same effect. The blueberries created a thick and luscious syrup and paired amazingly with the rosey apples. A perfect sweet bite.
Method:
1)Pre-heat oven to 350 Degrees Fahrenheit.
In a mixer fitted with a paddle attachment, mix together the flour and cubed butter. Mix until it looks like a "cornmeal" consistency. You can also do the same thing in a food processor.
2) Once butter and flour is mixed well, add in a Tb of cold water and watch for the dough to "come together" more. We added 1 Tb and waited about 30 seconds, and then added a second Tb. In total, we added 3 Tb. You know its ready when you can grab a small amount of dough, squeeze it and it holds together.
3) Divide dough in half (this will make the top and bottom), wrap in plastic wrap and chill for 15 min.
4) When ready, roll out 1 dough ball gently on a VERY well floured surface. Roll in a circular motion, counter-clockwise. As cracks form at the edges, close them up and continue rolling. Roll from inside out and make sure dough is large than the baking dish you have.

Use your scraper (or whatever its called), its my FAVORITE tool in the kitchen, to pick up the dough and add more flour underneath when necessary.

5) Once ready, roll the dough over your rolling pin and onto your pie dish. Crimp the edges together and make sure if fits in there well, but don't stretch the dough again. Stab uhh poke the bottom of the dough with a fork.
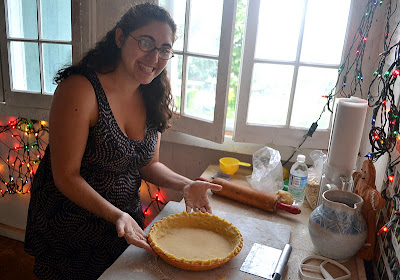 |
| Ta-Dah! |
6) In a separate bowl, mix together the apples (rosewater if using), blueberries, flour and sugar. Set aside.
7) Meanwhile, work with the other dough that you're going to make the lattice with.
Do the same rolling as you did with the first dough ball.
8) Once rolled out, use a sharp knife or even a pizza cutter, and cut the dough in half and then in thick strips.

9) When the pre-baked pie shell is done, add in the fruit mixture. It will look like a lot, but don't worry, it cooks down.

10) Now here's the fun part, and honestly...it is kinda hard to explain in typed-words.
But basically, what you want to do is start with the largest/thickest piece and go from the middle-out, while inter-lacing.
So put 2 strips of dough vertically and then 1 strip horizontally, while the horizontal strip overlaps 1 vertical strip. (Does that make any sense?) I think it is MUCH easier when you do it yourself!

11) When you are done lacing the dough, crimp all the edges around securely. If you have any leftover dough, DON'T throw it away, crimp it to the sides. The crust is the best part anyway!

Beautiful, isn't it??
12) Brush the top with egg wash and a healthy dusting of brown sugar.

13) Bake at 350 for 50-60min until crust is golden brown and fruit is bubbly.
Aloha Enjoy!
Hawaiian Mountain Rose Apple Pie
LittleFerraroKitchen.com
Ingredients
Crust
- 2 c white unbleached spelt flour
- ⅔ c butter chilled and cubed about 11 Tb
- Few Tb of cold water About 3 Tb
Filling
- 2-3 c frozen organic blueberries
- 4 c Hawaiian mountain apples sliced thinly
- or any small crisp red apples w/ 1Tbl of rosewater
- ½ c white unbleached spelt flour
- 1 c sugar
Topping
- Egg wash
- Brown sugar
Instructions
- Pre-heat oven to 350 Degrees Fahrenheit.
- In a mixer fitted with a paddle attachment, mix together the flour and cubed butter. Mix until it looks like a "cornmeal" consistency. You can also do the same thing in a food processor.
- Once butter and flour is mixed well, add in a Tb of cold water and watch for the dough to "come together" more. We added 1 Tb and waited about 30 seconds, and then added a second Tb. In total, we added 3 Tb. You know its ready when you can grab a small amount of dough, squeeze it and it holds together.
- Divide dough in half (this will make the top and bottom), wrap in plastic wrap and chill for 15 min.
- When ready, roll out 1 dough ball gently on a VERY well floured surface. Roll in a circular motion, counter-clockwise. As cracks form at the edges, close them up and continue rolling. Roll from inside out and make sure dough is large than the baking dish you have.
- Once ready, roll the dough over your rolling pin and onto your pie dish. Crimp the edges together and make sure if fits in there well, but don't stretch the dough again. Poke the bottom of the dough with a fork.
- In a separate bowl, mix together the apples (rosewater if using), blueberries, flour and sugar. Set aside.
- Meanwhile, work with the other dough that you're going to make the lattice with.
- Do the same rolling as you did with the first dough ball.
- Once rolled out, use a sharp knife or even a pizza cutter, and cut the dough in half and then in thick strips.
- When the pre-baked pie shell is done, add in the fruit mixture. It will look like a lot, but don't worry, it cooks down.
- To create the lattice, start with the largest/thickest piece and go from the middle-out, while inter-lacing.
- So put 2 strips of dough vertically and then 1 strip horizontally, while the horizontal strip overlaps 1 vertical strip.
- When you are done lacing the dough, crimp all the edges around securely. If you have any leftover dough, DON'T throw it away, crimp it to the sides.
- Brush the top with egg wash and a healthy dusting of brown sugar.
- Bake at 350 for 50-60min until crust is golden brown and fruit is bubbly.
Nutrition
Calories: 435kcalCarbohydrates: 66gProtein: 6gFat: 17gSaturated Fat: 10gPolyunsaturated Fat: 1gMonounsaturated Fat: 4gTrans Fat: 1gCholesterol: 41mgSodium: 124mgPotassium: 100mgFiber: 7gSugar: 35gVitamin A: 526IUVitamin C: 6mgCalcium: 11mgIron: 2mg
Did you make this recipe?Let us know by leaving a comment and 5 star rating!

Donna says
Hi,
You talk about the "pre-baked pie shell" but do not indicate how long to bake it. Does it have to be pre-baked?
Getting ready to make my first mountain apple pie and I need to know!
Samantha says
Hi Donna!! Wow that post was written a few years ago..lol Now that I look back on the recipe, I do not think we pre-baked the pie crust. We poked the bottom dough crust all over and added the filling and then added the top lattice layer and crimped all around. Hope that helps and I will change the instructions! Have fun baking!